How to Build an Android App Widget With Web Technologies Like HTML/CSS/JS Without Cordova or PhoneGap or Any Other External Framework At All
While there are many ways to build Android apps using web technologies, the same is not true for building Android App Widget in HTML/CSS/JS, which could instead be very desiderable in many circumstances. In this article we aim exaclty at that and, affording step by step all the tips, tricks & nuances that are needed to succesfully accomplish the task, we'll discover in the end that the goal is sincerely quite very achievable after all, and without the need for any external framework at all.
Introduction
Web technologies are spreading all over the world at increasing speed, feeding once again one of the oldest and all time greatest dream of all programmers of any age and places, the "write once, run anywhere" promise, many times flaunted but never completely accomplished by any tool, framework, company or tecnology so far.
Still, while it is possible nowaday to build apps with web technologies that with a single code base can be run at least on Android and iOS and with little additional effort also on Windows, Mac and Linux desktops thanks to the wonderful Progressive Web Application (PWA) specifications now widely adopted by almost every browser, the same cannot be said for some specific tasks that remain elusive to web technologies. One of this is surely the building of an Android App Widget which for its specific nature is particularly tricky to develop in HTML especially because the Android WebView cannot be used in an App Widget layout as by the Android specifications, and so cannot be used (at least not directly) to accomplish the task.
Well, this article presents an introductory solution to accomplish exactly that: build an Android App Widget in HTML.
The solution presented here is called introductory because to be honest there is really a lot that can be said, extended and further developed starting from the initial steps that follows in this article. Handling user interaction, refreshing the widget on external or inner (to the HTML content) events, handling the resizing and other events of the widget or managing more dynamic content for it and many other things are not the focus of this article, or it would become a book. Here, instead, we present a solid and proven way to have an HTML content to show in an Android App Widget without degrading the performance or drain the batteries of the device, but neither succumbing to the many glitches and nuances typically involved when trying to load an HTML content in a WebView, waiting for the parsing of the page and the rendering to be completed and then showing the content itself in the widget, which complete process is effectively quite tricky without the proper knowledge.
Anyway we don't want to stop here. If you find this article useful and well made and want to know more or further develop our solution, just rate this article and as soon as we reach the first 100 votes we will add new articles on the more advanced topics.
Also, this article comes with a full source code project that you can find on our github. Comment there, give suggestions for improvements or just watch the repository to help us improve this work and make sure you'll be updated of future developments.
1. So you want an Android App Widget built in HTML. Ok, but why?
Chances are if you are reading this article you already have well clear in your mind why you want to build an Android App Widget with HTML. Still, before starting we want to list all the reasons we have found so far. You know, maybe you find some other useful why too.
You want to build an Android App Widget in HTML because:
- you want to show in an Android App Widget the content of a website that already exsists.
- you want to show in an Android App Widget the content of an element/page you have already developed with web technologies.
- you want to give users a way to customize the content of the Android App Widget modifying its HTML/CSS code so that it's not necessary to re-compile the app and re-publish it on the Google Play store in order to see the changes.
- you want to be fast! Changing the HMTL/CSS/JS of a page is way faster than changing the various Android xml files, learning all their details, or even worse working with the Android native canvas API.
- it can be done! Yes, we are programmers. Sometimes we do things just because it's possibile! 😀
2. Starting point to build an Android App Widget in HTML
Writing an Android App Widget requires a fair amount of knowledge even to just start the project. We will not cover all the knowledge and preliminary steps required because this article is specific for HMTL Android App Widget so in order to fix a good starting point from which to build on we have identified an excellent generic Android App Widget tutorial from Google and we will use their code as a starting point, modifying it step by step til we reach our goal.
The complete tutorial is here: Advanced Android 02.1: App widgets
You don't need to get this (read on) but, just as reference, the original source code of their tutorial is here: AppWidgetSample
If you want to follow our tutorial modifying the original source code step by step while reading or even if you want our final code you can clone the source code we prepared specifically for this tutorial, which contains the two folders starting-code and final-code. The repository is here: android-html-app-widget
So if you are totally new to Android App Widget development we suggest you take first the after-mentioned Google tutorial and come back later to this article. For all the others we remember here what are the two main pillars that renders the Android App Widget development so different from all the rest of the Android programming, which are:
- while an App Widget surely execute in your own application, its visible parts, what the users see, is shown by another application, usually an Android Launcher. This is why RemoteViews are involved.
- unfortunately RemoteViews don't handle WebViews, hence all the trikery that we are going to make to write an HTML Android App Widget.
3. Let's code it!
Start cloning our repository android-html-app-widget on your machine in a folder of your preference. To make all the steps of this tutorial while reading them open with Android Studio the project in the starting-code sub folder of the cloned repository.
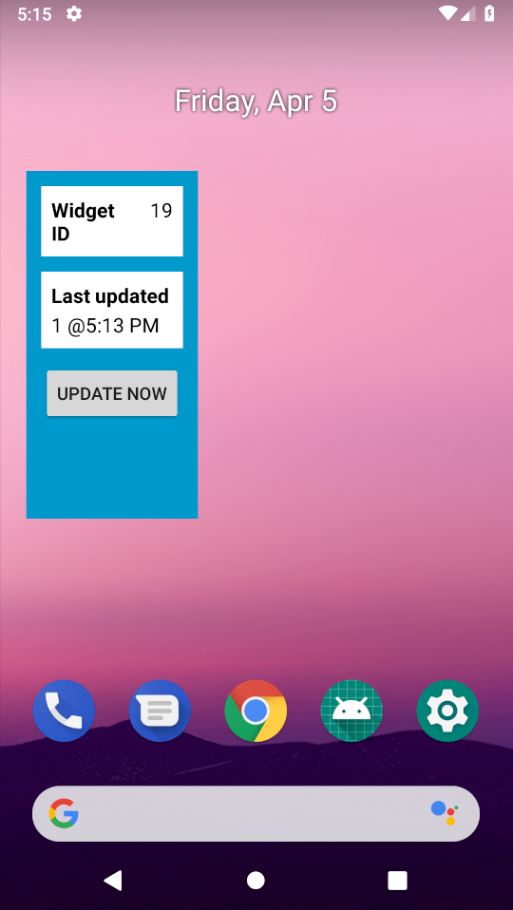
Compile the project and run it either on your Android device or in a pre-configured Virtual Device. When the app runs go to the Android home and add a AppWidgetSample widget. You should get a screen like this:
Now open in Android Studio the file: \res\layout\new_app_widget.xml.
Switch from Design to Text at the bottom of the IDE editor and delete all the content of RelativeLayout. In its place add this code:
\res\layout\new_app_widget.xml becomes:
\java\com\example\android\appwidgetsample\NewAppWidget.javaand replace the current method updateAppWidget in the class NewAppWidget with this one:
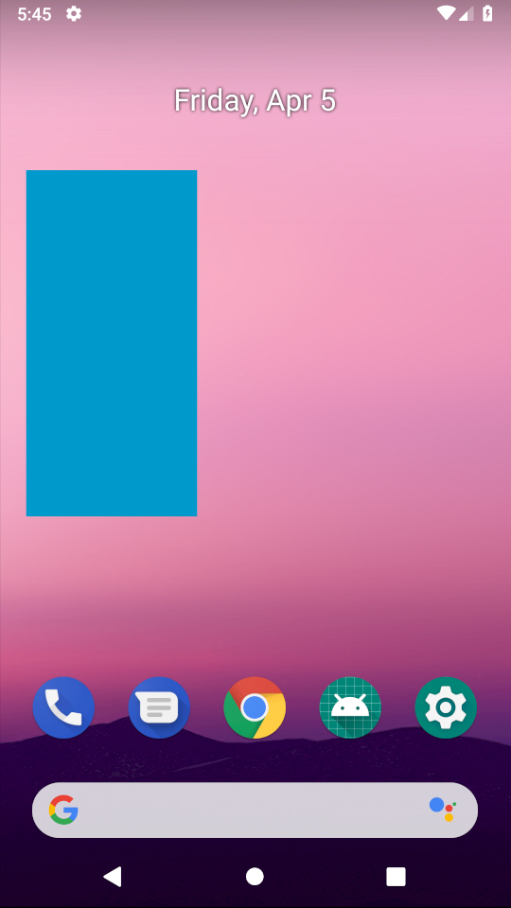
\res\layout\new_app_widget.xml with the attribute android:background="#09C" of the RelativeLayout.Image: all the content of the widget has been replaced with an empty image
Now, before proceding with the HTML content let's see why we added the ImageView element and how are we going to use it. Well, we added it because we cannot add a WebView directly in the layout of the widget. Android specifications infact do not allow a WebView in a widget. So what we have to do is to manipulate an offscreen WebView to have it to render the HTML in a canvas then copy the image of the camvas inside the ImageView of our widget then invoke the update for the widget using the AppWidgetManager method updateAppWidget.
As if all this was not enough complex on its own, we have to take in consideration some additional nuances, the most important of which, as we will see, is that a WebView renders its content asynchronously. It first needs to parse all the HTML/CSS/JS files as well as all the other elements of the page like the images and so on, then it organizes all them in the DOM and finally makes the drawing of the whole page. This means that most probabilly we will invoke the drawing of the WebView in our temporary canvas when the WebView has still not completed all its after-mentioned steps. And still, at the same time, we cannot wait for the WebView to do all its steps, because the Android specifications are very clear about the requirements for widget updates: they should be fast and never block the app hosting them (usually the Android Launcher). This is why most of the attempts to write an Android App Widget in HTML that are found on internet, when implemented in a real project, usually fail in same way or another.
Ok but let's proceed step by step solving one after the other all the problems.
First let's just write a native Hello World in our ImageView to see how this simple task can be accomplished and then let's proceed from there to an HTML version of the same.
To do this we will do our drawings in a bitmap which we will later set as the bitmap of our ImageView then we will finally invoke updateAppWidget. And here comes the first nuisance: to draw in a bitmap we need to create it and to create it we need to know which dimensions it should be, or what are the dimensions of the specific widget that we are updating since our ImageView covers all our widget surface. Well to know the dimensions of a widget we need to use the AppWidgetManager's method getAppWidgetOptions which has been added to Android on with API level 16. Still this method returns the sizes in dp, that is Density-independent Pixels while we really wnat instead the dimensions in pixels. To make a long story short here are the two additional classes we add to our project to handle these conversions in order to get the right dimensions for the bitmap we want to create. So please add these two classes in the same package of our NewAppWidget class:
AndroidUtil class
and
Sizes class
Then, since we are using a method only available from API Level 16 on, let's modify the file build.gradle changing the current line:
Now we can start making some drawings. Let's change our method updateAppWidget to do it:
Let's rebuild and run this new version of our widget to see what changed.
Well, ok, nothing really changed, we see exactly the same azure-ish rectangle we had before. Let's analyze what we have done and why nothing different seems to happen.
First we retreived the correct size of our widget in pixels, then we created a bitmap of the same size. We need to create a Canvas and associate the bitmap to it in order to perform some drawings, and we also did this. With drawColor then we clear the whole bitmap and with setImageViewBitmap and updateAppWidget we finally show it. At this point the only reason we still see the azure-ish rectangle is because, guess what, that is what we set as the background color of our widget. Let's change it to be a transparent background.
In the file \res\layout\new_app_widget.xml let's change the line:
Yes, I know, now it seems even worse, nothing is visible of the widget anymore, just our home screen backgroudn. Well, but in fact this is exaclty what our code does. Let's move on to the Hello World now.
3. Here comes the Hello World!, native and then in HTML
Let's write in our bitmap the classic Hello World! text. To do this we need to use the Canvas drawText method which by the way needs a Paint instance to work. Let's do both of this and our updateAppWidget method becomes:
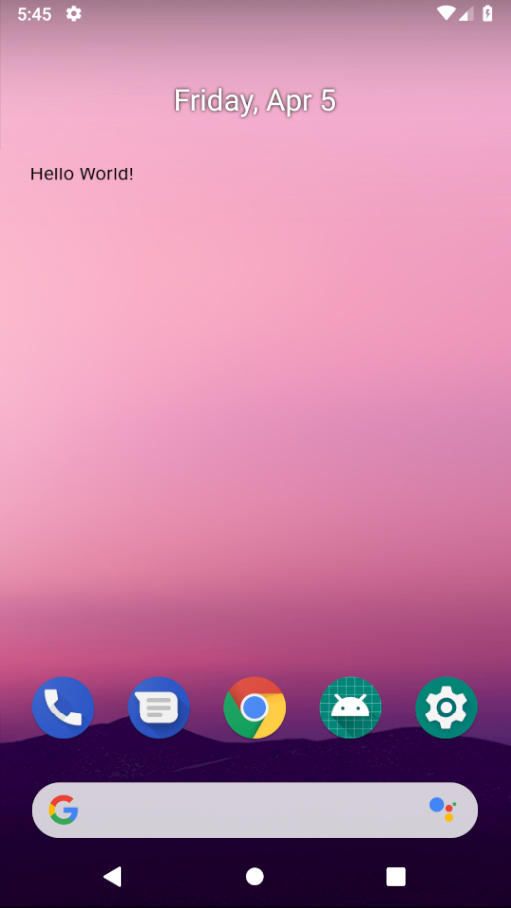
Android Native version of Hello World!
Compile and run it again. Yes, this time we did it!
Image: Android Native version of Hello World!
To convert this to an equivalent HTML version we have to:
- create a WebView;
- set the size of the WebView to the size of the widget;
- set the HTML content of the WebView;
- give enough time to the WebView to parse the HTML content and construct the DOM without blocking our app;
- let the WebView render its content into our canvas;
- set the content of our Camvas' bitmap to the ImageView of our widget;
- invoke the usual updateAppWidget;
The critical step here is the #4. To do it the right way we first need to create and cache a WebView for every widget instance of our app. In fact rember that every app can have more then one widget and since we need to wait for all the things we listed in #4 we cannot use the same WebView for every widget because it could happen that overlapping refreshes occur for different widgets at almost the same time.
To accomplish this let's create a new method in our NewAppWidget class to prepare the WebView for every instance of our widget. Let's call it prepareWebView.
This method makes:
- lazily creates a WebView for every instance of our widget and caches it in a static SparseArray field of our NewAppWidget class;
- configures the WebView enabling JavaScript, setting a transparent background and so on;
- sets the HTML content of the WebView;
These tasks are executed only if a WebView for the current instance of the widget does still not exist. If instead it already exists the method just passes the cached WebView to the caller.
The code for the methoid is here. Just also remember to add the required static field cachedWebViews in our NewAppWidget class:
The new method prepareWebView to be added in the NewAppWidget class
We can now call prepareWebView from within updateAppWidget, set the right dimensions for the WebView and... check if it is ready to paint it's content, that means if it has already parsed the HTML, loaded all external images, created the DOM and so on, and it's now ready to display its content. If WebView made all this we can let it draw the content inside our Canvas otherwise we have to wait.
So we have now to accomplish two tasks:
- check if WebView is ready to draw its content and if yes let it do it;
- wait for WebView to be ready if it is still not;
There could be many ways to accomplish the first task and we surely will investigate some of them probably in future articles if many of you will show interest in them. For now we propose to use the quickest way that could be employed which also offer an acceptable level of effectivenes: we will periodically check the size of the content of the WebView, and specifically its height, and will let the WebView draw its content into our canvas only when its size is bigger then zero, otherwise we will schedule a new check about 300 millisecondos in the future and give up paintign it now.
Let's star to modify our updateAppWidget method completing it later.
Replace the three lines:
with these other lines:
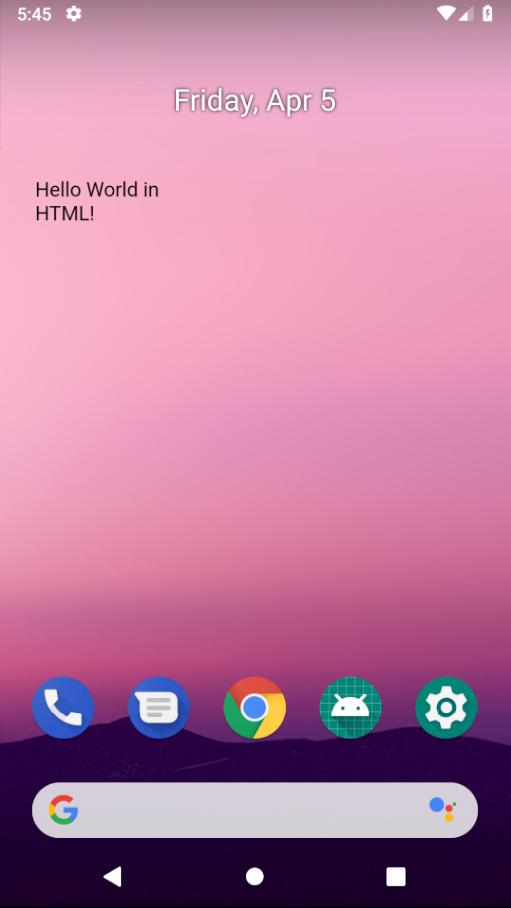
Compile and run it, and et voila your HTML version of Hello World! is served!
Image: HTML version of Hello World! in an Android App Widget
4. More useful Android App Widget built in HTML
Moving forward let's now get out of the simple Hello World! example and let's build something more useful.
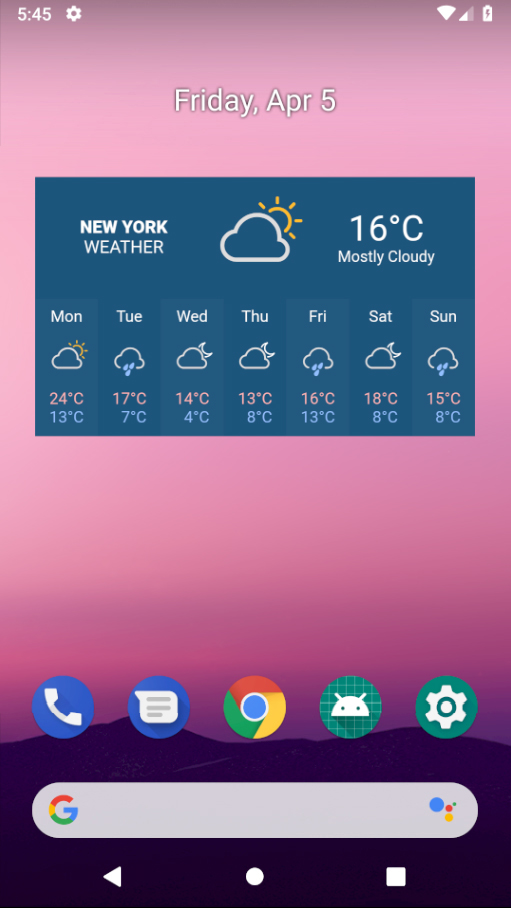
Suppose we want to show a weather widget available on internet inside our Android App Widget. We have choosen for this example a free weather widget from an external service (not associated with SyntaxCorrect) from WeatherWidget.io. The HTML for it is this:
Replace in our class NewAppWidget the line:
with this:
At this point if you compiled and run the app now you would be disappointed. Why? Well try!
The point is that the HTML weather widget is a dynamic element, that means it loads its content after the page has already been parsed and the DOM has been created by the WebView. This implies that when webView.getContentHeight() returns a non zero value the real content of the weather widget most probably has not even ever been fetched from the WeatherWidget.io servers. This is why we need additional and different ways than the mere webView.getContentHeight() to check when to draw our HTML Android App Widget, as we mentioned before. For now, just to conclude this first article on an Android App Widget written in HTML, we will just finish with a dirty workaround setting just to 2000 the milliseconds we wait before drawing the WebView. Just replace 300 with 2000 in the call handler.postDelayed in the updateAppWidget method of the class NewAppWidget and compile and run again the app.
Oh no, another disappointment, what is wrong now?
Well, this time is very easy, to fetch content from the internet from within your WebViews your app should ask for the permission of accessing the internet. To accomplish this we need to add:
into the AndroidManifest.xml file
Open it in Android Studio and add the permission just before the line:
Compile and run again. This time we did it!
Image: An HTML widget from an external website running in an Android App Widget
5. What is still missing
As promised we have accomplished the goal of this tutorial: build an Android App Widget in HTML. Still, as promised, there are a lot of additional TODOs we do not cover here because this is just an introductory article on the argument.
We will write follow ups articles should the interest in this first article manifested, so if you are interested in them rate this article, as soon as we reach the first 100 votes we will write the next article on the argument.
To speed up the process also consider sharing the articles on your favourite socials using the buttons on at the top of the page.
To give you a general preview of what other could follow about this argument consider this starting points:
- What other ways are there to check that the HTML content is ready to be painted?
- Ho to handle widget resizing or even just the change of screen orientation?
- Is there a way to handle user interaction like HTML element taps and the like?
- Can the HTML content be loaded from an asset file of the app?
- How to change the HTML content and refresh the widget?
Conclusion


Building an Android App Widget whose displayed content is entirely written in HTML is these days really feasible as demonstrated with this tutorial. This opens up a rich series of good opportunities to speed up the development of Android App Widget even when deep knowledge of the Android platform is missing or is incomplete. And in fact this is the main advantage of the adoption of web technologies when developing also for the mobile world: you can reuse the code from your web sites or from external services that are deployed in HTML/CSS/JS drastically reducing your development times required to reach to market.